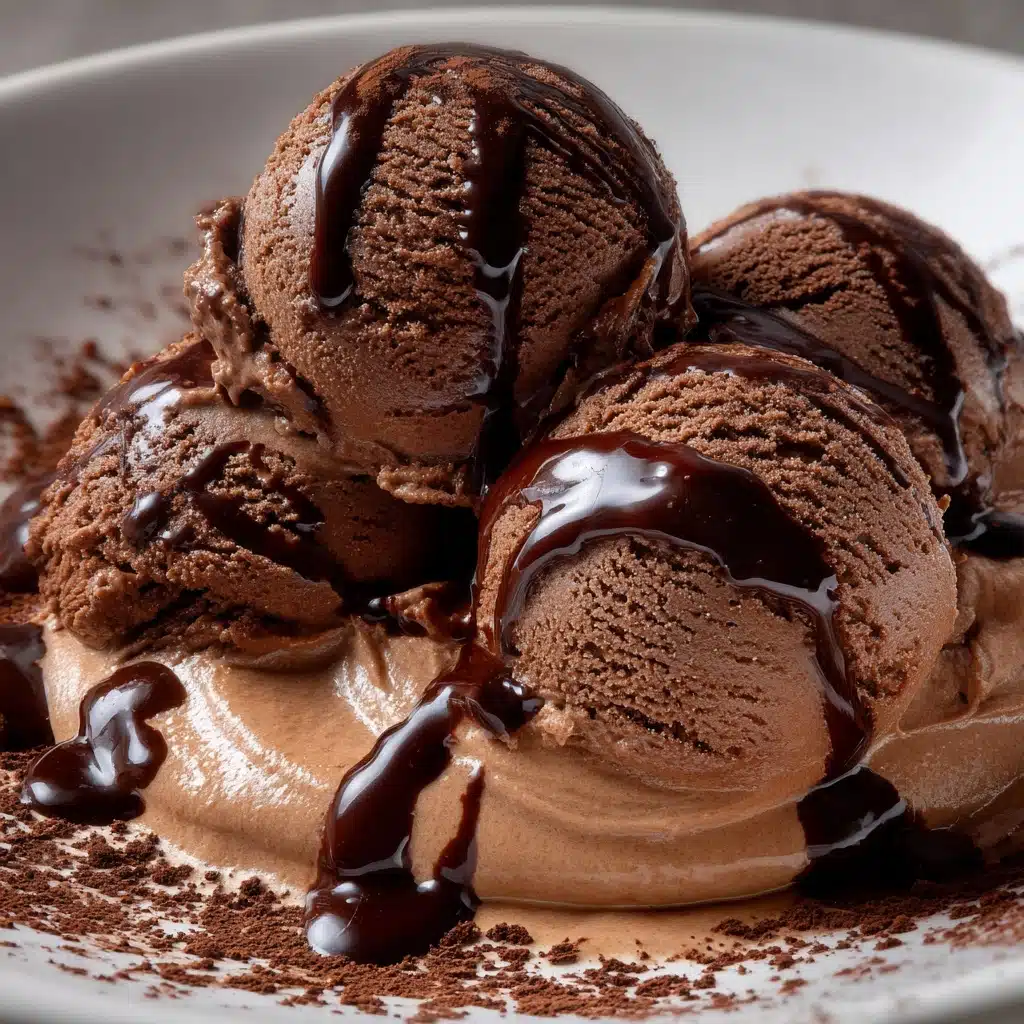
Homemade Chocolate Ice Cream Recipe
There’s just something magical about Homemade Chocolate Ice Cream that takes you straight back to childhood summers—only this version is richer, silkier, and completely irresistible. Whether you’re craving a cool treat on a sunny afternoon or searching for the perfect dessert to wow your friends, this creamy, custard-based chocolate ice cream hits every note. With deep chocolate flavor, velvety texture, and endless possibilities for mix-ins or toppings, you’ll wonder why you ever reached for the store-bought kind!
Ingredients You’ll Need
Ingredients You’ll Need
This Homemade Chocolate Ice Cream recipe is all about simple, quality ingredients working together to create pure chocolate bliss. Each component brings something unique to the table, from the richness of cream to the boldness of cocoa powder—so don’t skip or substitute! Here’s what you’ll need and why:
- Heavy cream (2 cups): The secret to that ultra-creamy, scoopable texture you love in real ice cream.
- Whole milk (1 cup): Balances the richness of the cream while keeping the ice cream smooth and luscious.
- Granulated sugar (3/4 cup): Sweetens the base and helps prevent iciness for that perfect melt-in-your-mouth feel.
- Unsweetened cocoa powder (1/2 cup): Delivers deep, chocolatey flavor and a gorgeous, rich color.
- Semisweet chocolate, chopped (4 oz): Adds a layer of intense chocolate goodness and a silky finish.
- Egg yolks (4 large): Give the ice cream its signature custard base, making every bite extra creamy.
- Vanilla extract (1 teaspoon): Enhances the chocolate flavor, making it more complex and aromatic.
- Pinch of salt: Just a touch brings out all the other flavors and keeps the sweetness in check.
How to Make Homemade Chocolate Ice Cream
Step 1: Warm Up the Base
Start by combining the milk, granulated sugar, unsweetened cocoa powder, and a pinch of salt in a medium saucepan. Place it over medium heat and whisk everything together until warmed through but not boiling. This step dissolves the sugar and cocoa, ensuring a super smooth base for your Homemade Chocolate Ice Cream.
Step 2: Melt in the Chocolate
Add the chopped semisweet chocolate straight into your warm mixture. Whisk until the chocolate has completely melted, turning your base into a glossy, deeply chocolatey custard starter. Take a deep breath—the aroma will already have you swooning!
Step 3: Temper the Egg Yolks
In a separate bowl, whisk the egg yolks until smooth. Now, here’s the important part: slowly pour about 1/2 cup of the hot chocolate mixture into the yolks, whisking constantly. This step, called tempering, prevents the eggs from scrambling and makes your ice cream rich and silky.
Step 4: Thicken the Custard
Gradually pour the egg yolk mixture back into your saucepan with the rest of the chocolate base. Cook over low heat, stirring all the time with a heatproof spatula or wooden spoon, until the mixture thickens enough to coat the back of your spoon—about 5 to 7 minutes. This is when your Homemade Chocolate Ice Cream base becomes luxuriously creamy.
Step 5: Add Cream and Vanilla
Once your custard has thickened, remove it from the heat. Stir in the heavy cream and vanilla extract. This not only cools the base down a bit but also brings a burst of creamy, fragrant goodness to the party.
Step 6: Strain and Chill
For the smoothest possible ice cream, pour your mixture through a fine mesh sieve into a clean bowl. Cover with plastic wrap (press it right against the surface to prevent a skin from forming), then chill in the fridge for at least 4 hours—or overnight, if you can wait!
Step 7: Churn and Freeze
Once your base is thoroughly chilled, pour it into your ice cream maker and churn according to the manufacturer’s instructions. The magic happens here: you’ll see the mixture transform into thick, dreamy Homemade Chocolate Ice Cream in about 20 to 25 minutes. Transfer to a freezer-safe container, smooth the top, and freeze for at least 2 hours to firm up before serving.
How to Serve Homemade Chocolate Ice Cream
Garnishes
The right garnish can elevate your Homemade Chocolate Ice Cream from delightful to downright decadent. Try a sprinkle of chocolate shavings, a drizzle of warm fudge sauce, a handful of toasted nuts, or even a dusting of flaky sea salt. Fresh berries or a dollop of whipped cream are always welcome, too!
Side Dishes
Pair your ice cream with crisp biscotti, buttery shortbread cookies, or a warm brownie for a classic dessert duo. If you’re feeling extra indulgent, sandwich a scoop between two chocolate chip cookies for the ultimate ice cream sandwich experience.
Creative Ways to Present
Let your imagination run wild! Serve scoops in homemade waffle cones, layer with berries and whipped cream for a parfait, or build a sundae bar with all your favorite toppings. For a party, try freezing mini scoops on sticks and dipping them in melted chocolate for bite-size treats.
Make Ahead and Storage
Storing Leftovers
If you find yourself with leftover Homemade Chocolate Ice Cream (lucky you!), keep it in an airtight, freezer-safe container. Press a piece of parchment or plastic wrap directly on the surface before sealing—this helps prevent those pesky ice crystals from forming.
Freezing
Homemade ice cream is at its best within the first week, but it will keep beautifully for up to two weeks in your freezer. After that, you may notice some changes in texture, but it’ll still be delicious in milkshakes or affogatos!
Reheating
While you won’t want to “reheat” ice cream, if your Homemade Chocolate Ice Cream is too firm straight from the freezer, let it sit at room temperature for 5 to 10 minutes. This softens it just enough for the perfect creamy scoop every time.
FAQs
Can I make Homemade Chocolate Ice Cream without an ice cream maker?
Yes, you can! After chilling the base, pour it into a shallow dish and freeze, stirring vigorously every 30 minutes until creamy and scoopable. While the texture may be a little less smooth, you’ll still get plenty of chocolatey satisfaction.
Can I use dark chocolate instead of semisweet?
Absolutely! Dark chocolate will give your Homemade Chocolate Ice Cream a more intense, slightly bittersweet flavor. Just be sure to taste the base and adjust the sugar if you prefer a sweeter result.
Is it safe to eat ice cream made with raw eggs?
This recipe uses egg yolks that are gently cooked into the custard base, which makes it safe to eat. If you have concerns, you can use pasteurized eggs for extra peace of mind.
How can I make my ice cream extra rich or flavorful?
For a richer flavor, try adding a splash of espresso or coffee liqueur to the base. You can also fold in chocolate chips, brownie chunks, toasted nuts, or even a swirl of caramel before freezing for an extra treat.
What’s the best way to prevent ice crystals in homemade ice cream?
Chilling the base thoroughly before churning and covering the surface with plastic wrap during storage are key. Using enough fat and sugar in the recipe also helps keep your Homemade Chocolate Ice Cream perfectly creamy.
Final Thoughts
If you’ve never tried making Homemade Chocolate Ice Cream from scratch, you’re in for a real treat. With its deep chocolate flavor and dreamy texture, it’s the kind of dessert that makes you look forward to every scoop. Gather your ingredients and give this recipe a whirl—you’ll be amazed at how easy (and rewarding) it is to create your own chocolate masterpiece!
Print
Homemade Chocolate Ice Cream Recipe
- Total Time: 30 minutes (plus chilling and freezing time)
- Yield: 1 quart (about 8 servings) 1x
- Diet: Vegetarian
Description
This Homemade Chocolate Ice Cream recipe delivers a rich, creamy, and intensely chocolatey dessert perfect for any occasion. Made with a custard base of egg yolks, cocoa powder, and semisweet chocolate, this churned ice cream combines smooth texture with deep flavor, ideal for classic dessert lovers.
Ingredients
Ice Cream Base
- 2 cups heavy cream
- 1 cup whole milk
- 3/4 cup granulated sugar
- 1/2 cup unsweetened cocoa powder
- 4 oz semisweet chocolate, chopped
- 4 large egg yolks
- 1 teaspoon vanilla extract
- Pinch of salt
Instructions
- Heat the Base: In a medium saucepan, combine milk, sugar, cocoa powder, and salt. Heat over medium heat until warm but not boiling. Stir in chopped chocolate and whisk until melted and smooth.
- Temper the Egg Yolks: In a separate bowl, whisk egg yolks. Slowly pour about 1/2 cup of the hot chocolate mixture into the yolks while whisking constantly to temper and avoid curdling.
- Combine Mixtures: Gradually whisk the yolk mixture back into the saucepan with the remaining chocolate mixture.
- Thicken Custard: Cook over low heat, stirring constantly, until the mixture thickens slightly and coats the back of a spoon, approximately 5–7 minutes.
- Finish the Base: Remove from heat and stir in heavy cream and vanilla extract.
- Strain and Chill: Strain the custard through a fine mesh sieve into a clean bowl. Cover and refrigerate for at least 4 hours or overnight until thoroughly chilled.
- Churn the Ice Cream: Pour the chilled custard into an ice cream maker and churn according to the manufacturer’s instructions.
- Freeze Until Firm: Transfer the churned ice cream to a freezer-safe container and freeze for at least 2 hours before serving.
Notes
- For an extra rich flavor, add a splash of espresso or coffee liqueur to the base.
- Fold in chocolate chips, brownie chunks, or nuts before freezing to add texture and variety.
- Prep Time: 20 minutes
- Cook Time: 10 minutes
- Category: Dessert
- Method: Churning
- Cuisine: American
Nutrition
- Serving Size: 1/2 cup
- Calories: 280
- Sugar: 24 g
- Sodium: 40 mg
- Fat: 19 g
- Saturated Fat: 11 g
- Unsaturated Fat: 7 g
- Trans Fat: 0 g
- Carbohydrates: 26 g
- Fiber: 2 g
- Protein: 5 g
- Cholesterol: 130 mg