**Coconut Domes with Chocolate Spread** Recipe
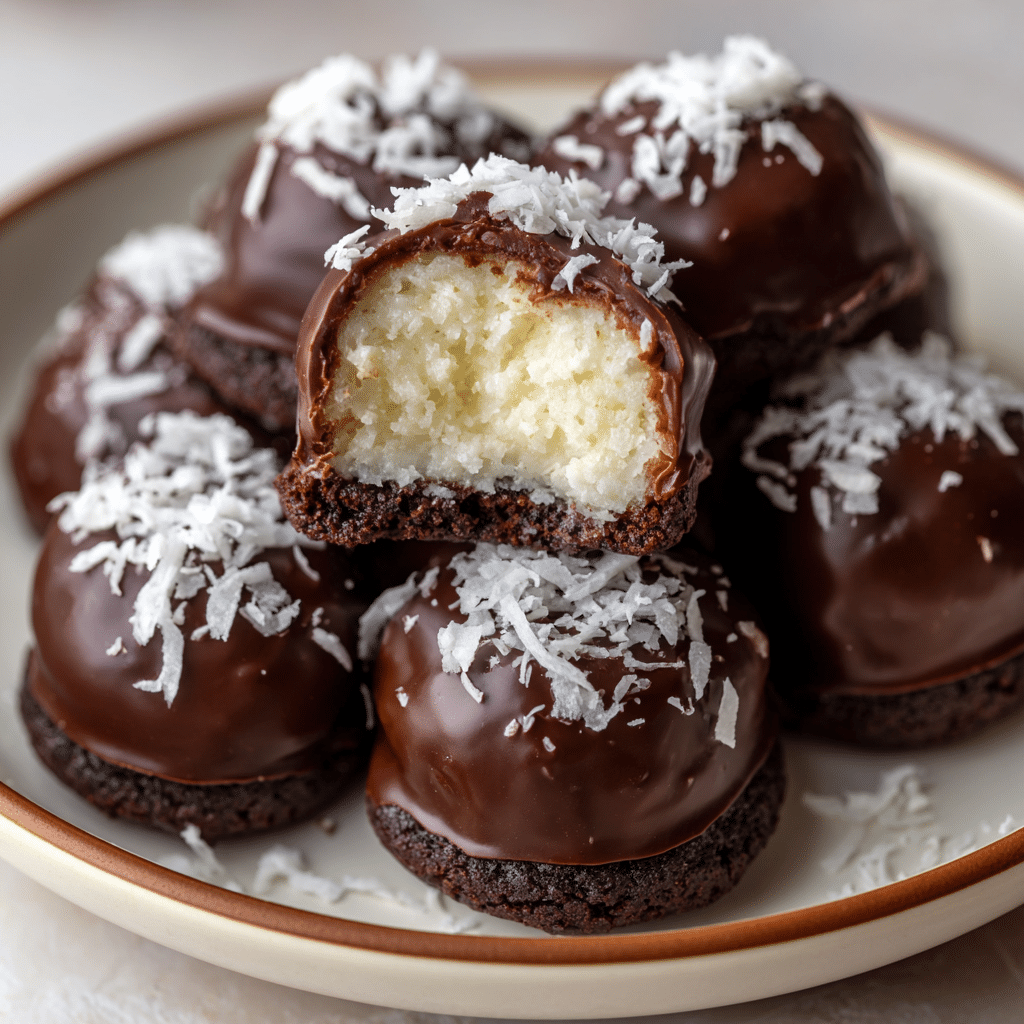
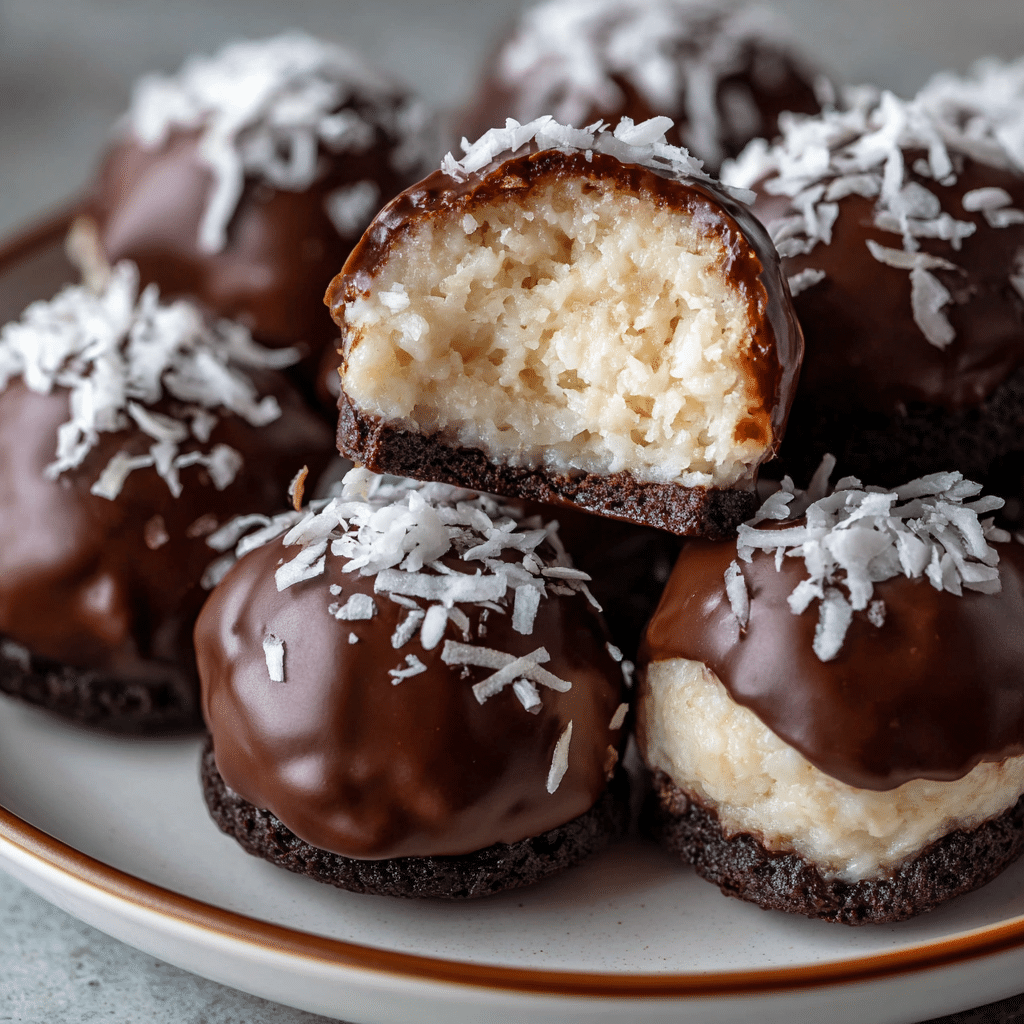
If you’re on the hunt for a show-stopping, no-bake treat that’s as easy as it is irresistible, let me introduce you to Coconut Domes with Chocolate Spread. Imagine tender, chewy coconut mingling with creamy chocolate hazelnut filling, all enveloped in a glossy chocolate shell. Each bite is a little escape—rich, decadent, and subtly tropical. This dessert is perfect for parties, holiday trays, or just because your sweet tooth insists. And the best part? You don’t need to turn on your oven or fuss with complicated steps to make a batch of these dreamy domes!
Ingredients You’ll Need
The magic of Coconut Domes with Chocolate Spread comes from a handful of simple ingredients, each one pulling its weight for flavor, texture, and that signature bite. Here’s what you’ll need and why you shouldn’t skip a single one!
- Shredded unsweetened coconut (1 1/2 cups): The star of the show—use finely shredded coconut for the best texture and a pure, clean coconut flavor.
- Sweetened condensed milk (1/2 cup): Acts as both sweetener and binder, giving the domes their chewy richness.
- Vanilla extract (1/2 teaspoon): A splash of vanilla rounds out the flavors and adds an inviting aroma.
- Pinch of salt: Just a tiny bit, but it’s crucial for balancing sweetness and making the flavors pop.
- Chocolate hazelnut spread or chocolate ganache (1/3 cup): For the luscious, surprise center—pick your favorite for a personalized touch.
- Dark or milk chocolate chips (1 cup): These melt into a smooth, shiny coating that cracks delightfully when you bite in.
- Coconut oil (1 teaspoon, optional): If you want a super-smooth chocolate coating, don’t skip this easy trick.
How to Make Coconut Domes with Chocolate Spread
Step 1: Mix the Coconut Base
In a medium bowl, combine your shredded coconut, sweetened condensed milk, vanilla extract, and that all-important pinch of salt. Stir everything together until you have a thick, sticky mixture—think snowballs that want to stick together. This is the foundation of your domes, so be sure everything is evenly coated and there are no dry spots.
Step 2: Shape and Chill the Domes
Scoop out about a tablespoon of the coconut mixture and press it into a silicone half-sphere mold, or shape it gently by hand into a dome if you don’t have a mold. Use your finger or the back of a spoon to press a small indentation into the center of each dome—this is where the magic (the chocolate spread!) will go. Pop the tray into your freezer for 20 to 30 minutes so the domes can firm up and hold their shape.
Step 3: Add the Chocolate Filling
Once the coconut domes have set, it’s time for the decadent heart of these treats. Spoon about half a teaspoon of chocolate hazelnut spread or ganache into each indentation. Then cover the filling with a little extra coconut mixture, pressing gently to seal and create a perfect dome. Once all your domes are filled and sealed, return them to the freezer for another 15 to 20 minutes to ensure they’re nice and solid for dipping.
Step 4: Melt and Coat with Chocolate
While your domes are chilling, melt the chocolate chips (with coconut oil, if using) in the microwave in 30-second bursts, stirring between each, until you’ve got a glossy, smooth pool of chocolate. Using a fork or spoon, dip each dome into the melted chocolate, letting any excess drip off. Place them on a parchment-lined tray and pop them in the fridge to set. The chocolate will harden into a shiny shell that’s just waiting to be cracked!
How to Serve Coconut Domes with Chocolate Spread
Garnishes
A sprinkle of extra shredded coconut on top of each dome before the chocolate sets gives a lovely snowy look and a hint about what’s inside. You could also try a light dusting of cocoa powder or even a pinch of flaky sea salt to really make the flavors sing.
Side Dishes
Serve Coconut Domes with Chocolate Spread alongside a platter of fresh berries or tropical fruit—they’ll balance the richness with their juicy tartness. A small espresso or cup of strong black tea makes the perfect pairing, cutting through the sweetness and complementing the chocolate.
Creative Ways to Present
Arrange the domes in mini cupcake liners for a polished look, or stack them on a tiered dessert tray for a dramatic centerpiece. For extra flair, drizzle some melted white chocolate over the tops or use edible gold leaf for an elegant touch at parties. You can even make mini versions for bite-sized treats at gatherings!
How to Serve
Serve this delicious recipe with your favorite sides.
Make Ahead and Storage
Storing Leftovers
To keep your Coconut Domes with Chocolate Spread at their best, store them in an airtight container in the fridge. They’ll stay fresh and chewy for up to a week, making them a great make-ahead treat for parties or late-night cravings.
Freezing
If you want to make a big batch ahead of time, these domes freeze beautifully. Once set, place them in a single layer on a tray to freeze, then transfer to a freezer-safe bag or container. They’ll keep their flavor and texture for up to two months—just let them thaw in the fridge before serving for the best texture.
Reheating
There’s no need to reheat these treats, but if you like a softer, gooey center, let the domes sit at room temperature for 10 to 15 minutes before enjoying. This gives the chocolate spread inside a chance to become extra creamy.
FAQs
Can I use sweetened coconut instead of unsweetened?
You can, but it will make the domes much sweeter. If you do substitute, you might want to reduce the amount of sweetened condensed milk a little to keep things balanced.
What if I don’t have a silicone mold?
No problem! Just shape the coconut mixture by hand into domes. They may not be perfectly uniform, but they’ll still look adorable and taste incredible.
Can I make these nut-free?
Absolutely—just use a dairy-free chocolate ganache or your favorite nut-free chocolate spread in place of the hazelnut spread. The result is just as luscious and satisfying.
What kind of chocolate works best for coating?
Both dark and milk chocolate chips work beautifully, so go with your preference. If you want a less sweet dome, choose dark chocolate. For a creamier finish, opt for milk chocolate. Adding a little coconut oil helps the chocolate coat smoothly.
How long do Coconut Domes with Chocolate Spread last?
Stored in the fridge, these domes will stay fresh for up to a week. If you freeze them, you’ll get about two months of deliciousness—just defrost before serving.
Final Thoughts
If you’re ready for a dessert that’s as fun to make as it is to eat, you have to try Coconut Domes with Chocolate Spread. They’re a little taste of paradise in each bite, perfect for sharing (or not!). Gather your ingredients and treat yourself—you won’t be disappointed!
Print
**Coconut Domes with Chocolate Spread** Recipe
- Total Time: 50 minutes (including chilling)
- Yield: 12 domes 1x
- Diet: Vegetarian
Description
These Coconut Domes with Chocolate Spread are delightful no-bake treats combining the tropical flavor of shredded coconut with a rich chocolate-hazelnut center. Perfect for parties or holiday trays, these bite-sized domes feature a creamy filling encased in a smooth chocolate coating, making an indulgent yet easy-to-make dessert.
Ingredients
Main Mixture
- 1 1/2 cups shredded unsweetened coconut
- 1/2 cup sweetened condensed milk
- 1/2 teaspoon vanilla extract
- Pinch of salt
Filling and Coating
- 1/3 cup chocolate hazelnut spread or chocolate ganache (for filling)
- 1 cup dark or milk chocolate chips (for coating)
- 1 teaspoon coconut oil (optional, for smoother coating)
Instructions
- Prepare the coconut mixture: In a medium bowl, mix shredded coconut, sweetened condensed milk, vanilla extract, and a pinch of salt until fully combined. The mixture should be thick and sticky, suitable for shaping.
- Shape and chill domes: Scoop out 1 tablespoon of the mixture and press it into a silicone half-sphere mold or shape by hand into a dome. Create a shallow indentation in the center of each dome using your finger or a small spoon. Place the domes in the freezer for 20–30 minutes until firm.
- Fill and seal: Remove the domes from the freezer and fill each indentation with about 1/2 teaspoon of chocolate hazelnut spread. Cover the filling with a small amount of coconut mixture and gently press to seal into a full dome shape. Return the domes to the freezer for an additional 15–20 minutes.
- Melt chocolate coating: While domes chill, melt the chocolate chips with coconut oil (if using) in the microwave in 30-second intervals, stirring between each until smooth and fully melted.
- Coat the domes: Dip each chilled coconut dome into the melted chocolate using a fork or spoon, allowing excess chocolate to drip off. Place the coated domes on a parchment-lined tray.
- Set and store: Refrigerate the coated domes until the chocolate hardens, then store in an airtight container in the fridge for up to 1 week before serving.
Notes
- Store coconut domes in an airtight container in the refrigerator to keep them fresh for up to one week.
- For a nut-free version, substitute the chocolate hazelnut spread with dairy-free chocolate ganache for the filling.
- Use silicone molds for consistent shapes, or shape by hand for a rustic look.
- These treats are perfect as bite-sized snacks for party platters or holiday dessert trays.
- Prep Time: 20 minutes
- Cook Time: 0 minutes
- Category: Dessert
- Method: No-Bake
- Cuisine: European-Inspired
Nutrition
- Serving Size: 1 dome
- Calories: 160
- Sugar: 12g
- Sodium: 35mg
- Fat: 10g
- Saturated Fat: 7g
- Unsaturated Fat: 2g
- Trans Fat: 0g
- Carbohydrates: 16g
- Fiber: 2g
- Protein: 2g
- Cholesterol: 2mg

