Grasshopper Cheesecake Bars Recipe
There’s something magical about the moment chocolate and mint collide, and Grasshopper Cheesecake Bars capture that sensation perfectly. Imagine a luscious, creamy cheesecake filling—tinged with cheerful green and a cool minty breeze—sitting atop a decadent chocolate cookie crust. Each bite is the ultimate indulgence for anyone who loves the classic blend of sweet chocolate and refreshingly smooth crème de menthe. Whether you’re hosting friends or treating yourself on a quiet evening in, these bars are an unapologetic showstopper that always spark joy.

Ingredients You’ll Need
These Grasshopper Cheesecake Bars come together thanks to a handful of easy-to-find ingredients, each one playing a crucial role in creating their classic flavor, iconic color, and show-stopping texture. Here’s what you’ll need, plus a few tips to make the process smooth and sweet!
- Chocolate sandwich cookies: Crushed into fine crumbs, these build the perfect, sturdy chocolatey base for your bars.
- Unsalted butter (melted): Helps bind your crust and ensures each bite has that irresistible richness.
- Cream cheese (softened): The key ingredient to make your cheesecake layer silky and decadent—let it soften for fuss-free blending.
- Granulated sugar: Sweetens the filling just the right amount, balancing the tang of cream cheese and freshness of mint.
- Large eggs: Give the cheesecake structure and keep it smooth and creamy as it bakes.
- Sour cream: Adds a gentle tang and keeps the cheesecake extra moist and tender.
- Crème de menthe liqueur: Brings vibrant mint flavor and that gorgeous green hue—absolutely signature for Grasshopper Cheesecake Bars!
- Crème de cacao liqueur: A subtle hint of chocolatey depth that elevates the filling to the next level.
- Peppermint extract: Gives the bars that unmistakable cooling mint finish. Go easy—a little goes a long way!
- Green food coloring (optional): For an extra pop of color that makes these treats as fun to look at as they are to eat. Use sparingly to reach your perfect shade of green.
- Semi-sweet chocolate chips: Dotted over the top for melty, gooey chocolate in every slice.
- Whipped cream and chocolate shavings (optional): To garnish and add that final tempting flourish right before serving.
How to Make Grasshopper Cheesecake Bars
Step 1: Prepare the Baking Pan and Preheat the Oven
Start by preheating your oven to 325°F (163°C). Line an 8×8-inch baking pan with parchment paper, letting the paper hang over the sides—this makes lifting out the finished bars a breeze. Proper prep sets you up for perfectly neat slices at the end!
Step 2: Make the Chocolate Cookie Crust
Pop your chocolate sandwich cookies into a food processor and pulse until you have fine, even crumbs. Blend in the melted butter until everything looks like wet sand. Press the crumb mixture firmly and evenly into the bottom of your lined pan. This is your base layer, so don’t be shy—use the bottom of a measuring cup for a super smooth, compact crust. Bake the crust for 10 minutes, then set aside to cool slightly.
Step 3: Whip Up the Cheesecake Filling
In a large bowl, beat the softened cream cheese and granulated sugar until absolutely creamy and luscious—no lumps allowed! Next, add in eggs one at a time, fully incorporating each before the next. This helps the filling stay extra smooth. Stir in the sour cream, crème de menthe, crème de cacao, peppermint extract, and (if using) a few drops of green food coloring until the mixture is completely blended and vibrantly minty.
Step 4: Assemble and Bake
Pour the cheesecake mixture over your cooled crust and gently smooth the top. Sprinkle the semi-sweet chocolate chips evenly over the surface. Slide the pan into the oven and bake for 35 to 40 minutes; you want the center just set—a slight jiggle is perfect! Once done, let the bars cool at room temperature, then refrigerate for at least 3 hours to make sure they’re perfectly firm for slicing.
Step 5: Garnish and Slice
Once chilled, lift the bars from the pan using the parchment paper. Slice into 12 generous squares. For that iconic finishing touch, add dollops of whipped cream and a scatter of chocolate shavings—everyone loves a little flourish!
How to Serve Grasshopper Cheesecake Bars

Garnishes
For the prettiest presentation and an extra touch of luxury, go all out with piped whipped cream and a sprinkle of chocolate shavings on top of each Grasshopper Cheesecake Bar. If you want to lean into the minty theme, a tiny sprig of fresh mint adds instant color and freshness!
Side Dishes
Since Grasshopper Cheesecake Bars are so delightfully rich, pair them with something light and refreshing—a bowl of fresh strawberries or raspberries works beautifully. For a fancier occasion, try serving with an after-dinner coffee or a small glass of chilled crème de menthe.
Creative Ways to Present
Want to turn heads at your next gathering? You can stack individual bars on a tiered dessert stand for a playful, party-ready look, or nestle them among other chocolate sweets for a themed dessert spread. Try cutting them into bite-sized cubes and serving on mini cupcake papers for a crowd-friendly finger food version!
Make Ahead and Storage
Storing Leftovers
Grasshopper Cheesecake Bars actually get even creamier after a day in the fridge! Store any leftover bars in an airtight container in the refrigerator for up to five days. Be sure to keep garnishes separate if you want everything to look its best the next day.
Freezing
To freeze, arrange your cooled, un-garnished bars in a single layer on a baking sheet. Once firm, wrap individually or layer with parchment in a freezer container. They’ll keep for up to two months—just thaw overnight in the fridge for a treat that tastes freshly baked!
Reheating
There’s no need to reheat Grasshopper Cheesecake Bars—these are best served cold! In fact, the chilly temperature helps their flavors shine. Just let frozen bars thaw in the fridge and enjoy straight from the cold for the best taste and texture.
FAQs
Can I make Grasshopper Cheesecake Bars without alcohol?
Absolutely! Swap both the crème de menthe and crème de cacao for 1/2 teaspoon of mint extract and two tablespoons of heavy cream. You’ll still get the signature green color and refreshing mint flavor, minus the liqueur.
Why did my cheesecake crack on top?
Cracking can happen if the bars are overbaked or cool too quickly. Don’t worry—it won’t affect the taste! Be sure to bake until just set, and always let your bars cool gradually at room temp before transferring to the fridge.
How do I get neat, clean slices?
The secret is a long, sharp knife dipped in hot water and wiped clean between cuts. Chilling the bars thoroughly also helps each piece hold its shape for picture-perfect squares!
Can I use a different type Dessert
Sure thing! Try chocolate graham crackers, vanilla sandwich cookies, or even brownie batter as alternatives. Each version brings a unique twist, but the chocolate sandwich cookie crust remains a classic favorite.
Are Grasshopper Cheesecake Bars gluten-free?
You can easily make them gluten-free by using certified gluten-free chocolate sandwich cookies for the crust. The rest of the ingredients are naturally gluten-free, so everyone can join in on the minty-chocolate fun!
Final Thoughts
Whether you’re a cheesecake connoisseur or just looking for your next crowd-pleasing dessert, Grasshopper Cheesecake Bars are a mint-chocolate marvel that never disappoints. I hope you’ll give them a try and savor every cool, creamy, chocolatey bite—don’t be surprised if these bars become the treat everyone requests again and again!
Print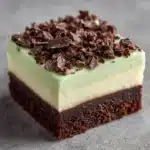
Grasshopper Cheesecake Bars Recipe
- Total Time: 4 hours (including chilling)
- Yield: 12 bars 1x
- Diet: Vegetarian
Description
Indulge in the refreshing flavors of mint and chocolate with these Grasshopper Cheesecake Bars. A creamy cheesecake filling infused with crème de menthe and crème de cacao rests on a chocolate cookie crust, topped with chocolate chips for a decadent treat.
Ingredients
For the Crust:
- 24 chocolate sandwich cookies (like Oreos)
- 1/4 cup unsalted butter, melted
For the Filling:
- 16 oz cream cheese, softened
- 3/4 cup granulated sugar
- 2 large eggs
- 1/4 cup sour cream
- 1/4 cup crème de menthe liqueur
- 2 tablespoons crème de cacao liqueur
- 1/2 teaspoon peppermint extract
- Green food coloring (optional)
- 1/2 cup semi-sweet chocolate chips
- Whipped cream and chocolate shavings for garnish (optional)
Instructions
- Preheat the Oven: Preheat oven to 325°F (163°C) and line an 8×8-inch baking pan with parchment paper.
- Prepare the Crust: Pulse chocolate cookies in a food processor, mix with melted butter, press into pan, and bake for 10 minutes.
- Make the Filling: Beat cream cheese and sugar, add eggs, then mix in sour cream, liqueurs, peppermint extract, and food coloring.
- Assemble: Pour filling over crust, sprinkle with chocolate chips, bake for 35–40 minutes, then cool and chill for at least 3 hours.
- Serve: Garnish with whipped cream and chocolate shavings before serving.
Notes
- You can substitute liqueurs with mint extract and cream for a non-alcoholic version.
- Adjust food coloring to achieve desired hue.
- Serve chilled for best results.
- Prep Time: 20 minutes
- Cook Time: 40 minutes
- Category: Dessert
- Method: Baking
- Cuisine: American
Nutrition
- Serving Size: 1 bar
- Calories: 310
- Sugar: 20 g
- Sodium: 210 mg
- Fat: 20 g
- Saturated Fat: 12 g
- Unsaturated Fat: 7 g
- Trans Fat: 0 g
- Carbohydrates: 28 g
- Fiber: 1 g
- Protein: 4 g
- Cholesterol: 60 mg